BB02: Reading Switches

Moderator: DisasterArea

Post Reply
DisasterArea
Posts: 26
Joined: Sat Jul 25, 2020 7:07 pm

BB02: Reading Switches

Post by DisasterArea »

Have you ever looked at your FXCore dev board and wondered "what are all these switches?!" Yes, the dev board has a lot of DIP switches. Some are not designed to be tweaked in real-time, some are to set the parameters of the chip, and some are available to you in your program. Generally you can read all of them, but not all of them are super useful to you while writing code. Let's look at them:

Image

Let's ignore the jumpers, these are for hardware hacking and troubleshooting.

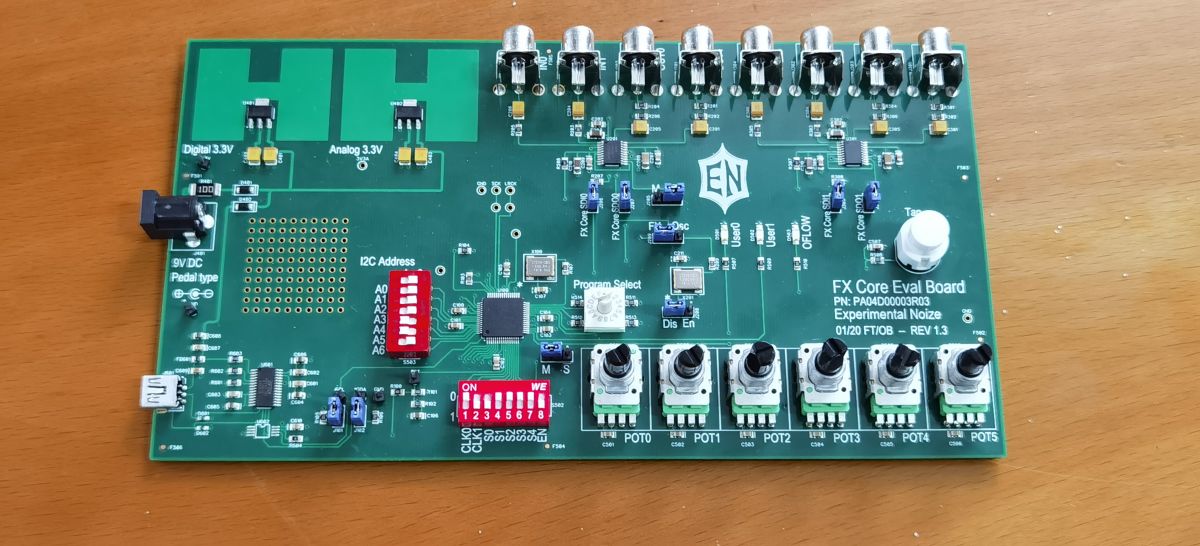
The main ones we care about are the S0-S4 at the bottom center of the board. These are pins that have their own pull-up resistors and are read by the FXCore every sample. You can read them by looking at the SWITCH SFR. Each switch has its own mnemonic code in the assembler so you don't need to know which bit is which. BTW the values are SW0-4, not S0-4 despite the label on the dev board. Here's how it works:

Code: Select all

cpy_cs		acc32, switch		; copy switch SFR into acc32
andi		acc32, sw0		; mask off all of the switches except s0
jz		acc32, switch_closed	; if the switch is set to ON, then do something
jmp		switch_open		; if not, jump to the switch_open routine

switch_closed:
; put some actions here to run if the switch is closed
jmp		done			; and jump to done when finished

switch_open:
; put some actions here to run if the switch is open
jmp		done			; and jump to done when finished

done:
xor		acc32, acc32		; must have an instruction after the last label, end of program
So you can use those switches to do just about anything in your code that you'd like. Let's say you have a delay effect, and you want to let the user bypass it but leave the delay "trails" present. You can't use the "EN" / aka bypass switch because that will kill the delay trails, so you will need to use one of the switch pins like SW0, which looks like this:

Code: Select all

; delay effect with bypass trails
; pot0 delay time
; pot1 delay feedback / repeat
; pot2 delay mix
; sw0 bypass

.mem	delay	30000

.rn	input	r0
.rn	feedback	r1
.rn	temp	r14
.rn	temp2	r15

; read input and put in register

cpy_cs	input, in0		; get input

; read bypass switch and mute input if we are in bypass
; this lets the trails ring out, we're just cutting the feed
; to the delay but leaving the output alone

cpy_cs	acc32, switch	; get switch
andi		acc32, sw0	; test for switch 0
jz		acc32, doBypass	; if the switch is closed, we bypass
jmp		doDelay		; if the switch is open, we do not bypass

doBypass:
xor		acc32, acc32	; clear acc
cpy_cc		input, acc32	; put zero in input

doDelay:
adds		feedback, input	; add feedback to input
wrdel		delay, acc32	; write result to delay line

wrdld		acc32, delay!		; put size of delay in acc32
cpy_cc		temp, acc32		; store in temp
cpy_cs		acc32, pot0_smth	; get pot0 value for delay time
multri		acc32, 0.95		; scale to 95%
addsi		acc32, 0.05		; now ranges from 5% to 100% (pretty close anyway)
multrr		temp, acc32		; scale knob value by size of delay

interp		acc32, delay		; get delay from current position, which is in the acc32

cpy_cc		temp, acc32		; put the delay audio in temp for a sec, so we can do feedback
cpy_cs		acc32, pot1_smth	; get pot1 for feedback
multrr		temp, acc32		; scale feedback to pot value
multri		acc32, 0.9		; limit feedback so it doesn't oscillate
cpy_cc		feedback, acc32		; store scaled feedback so we can add it in next sample

cpy_cs		acc32, pot2_smth	; get mix pot value
multrr		acc32, temp		; remember our delay audio is in temp!
adds		input, acc32		; add the delay out (scaled) to the input, gets us delay + dry mixed
cpy_sc		out0, acc32		; and send to output	

Try that on your dev board and see how you like it. It's a neat feature that is a lot more difficult to do on something like an FV-1 or using purely analogue means. If you choose to use a momentary switch on your final product, you can also read the state of the switch pin's momentary values by substituting "SW0PE" (switch zero, push edge) for "SW0." You will need to maintain your own flag or value in your code to keep track of the state of whatever you are switching, I have a nice example of that here.

So now we know about the main switches, which are designed to be accessed in our code any time. What about the other ones on the board?

On the same block as the SW0-SW4 user switches, we also have EN, which will bypass all audio processing on the FXCore by essentially connecting in0 to out0 and in1 to out1 internally. The chip is still running but you will only hear bypassed audio. This switch can be read in your program using the SWITCH SFR, same as SW0-SW4.

Code: Select all

cpy_cs		acc32, switch		; get switch input
andi		acc32, enabledb		; get enable pin value
Not super useful, since no audio is happening here, but it can be good for turning the LED on or off, for example.

Then at the other end of the block we have the PLL RANGE switches, which set the sample rate. These can be read using the BOOTSTAT register, which is only updated when the FXCore resets. This also means that the FXCore's sample rate can only change on a reset, so don't freak out if you flip the switches and you don't hear a change. Usually you will have a single sample rate in your program and you can design around whatever that is, but if for some reason you need to change the rate you can write some code to have your program adapt to that rate. PLL Range is the lowest two bits of BOOTSTAT.

IMPORTANT NOTE: BOOTSTAT is only read from the FXCore after a reset! If you change one of the pins that is part of this SFR, the FXCore won't update BOOTSTAT or change its own parameters until you reset it. So you can't change the I2C address or the PLL range on the fly, for example.

Code: Select all

; read PLL range
cpy_cs		acc32, BOOTSTAT		; get boot state
andi		acc32, 0x0003		; we just want the LSBs, 0 and 1

; pll range is in the acc.  00 = 12kHz, 01 = 24kHz, 10 = 32kHz, 11 = 48kHz
; your code can do whatever you'd like, such as changing filter coefficients or LFO range
And finally, we have 7 switches for the I2C address. This is the value the FXCore listens for when you're trying to program it. I2C devices need to have an address, or a unique identifier that is different than all of the other I2C devices on a board. Some devices have hard-coded addresses like 0x50 for EEPROMs, some devices have pins that you can tie high or low to set their address. FXCore is set to 0x30, which is 011 0000 in binary or 48 in decimal. You can set this to anything you want, as long as it doesn't conflict with another I2C device on your board. 0x30 is nice and safe in most cases.

I2C address is also read using the BOOTSTAT register

Code: Select all

cpy_cs		acc32, bootstat		; copy SFR BOOTSTAT into acc32
andi		acc32, 0xFFFF		; I2C address is in bits 3-9 of BOOTSTAT so mask off the lower half
sr		acc32, 3		; shift result right by 3 bits, now I2C address is in acc.  Ranges from 0-127 or 0x00-0x7F
Even though BOOTSTAT is only read on FXCore reset, you can use the I2C address pins for "set-and-forget" type options in your code, though! If it's something the user might change rarely, and you don't have a pin available for them to use, you can use the I2C address pins. Just remember you'll need to change them back to their defaults before you reprogram the FXCore in the future.

How is this useful? Well, let's take the delay program example from above. If we want to allow the user to enable or disable the delay trails function normally we would have to dedicate one of our limited user switches to this purpose. But if you don't mind changing it when the power is off, you can use one of the I2C address pins to set it. This is ideal for something that doesn't get changed a lot, for example a DIP switch that you might put inside a pedal. Just remember that you've changed this address and you won't be able to program using the default 0x30 value unless you change it back!!! Also make sure that whatever you change the address to doesn't conflict with other devices in your pedal!

Code: Select all

; same delay effect, but uses I2C address pin 0 to enable or disable trails!
; this switches the I2C address between 0x30 and 0x31, make sure it doesn't conflict with other devices in your system!
; delay effect with bypass trails
; pot0 delay time
; pot1 delay feedback / repeat
; pot2 delay mix
; sw0 bypass
; I2CA0 trails enable

.mem	delay	30000

.rn	input	r0
.rn	feedback	r1
.rn	temp	r14
.rn	temp2	r15

; read input and put in register

cpy_cs	input, in0		; get input

; put high value in temp2 for later
wrdld		acc32, 0x7FFF	; fill upper bits
ori		acc32, 0xFFFF	; and lower bits
cpy_cc		temp2, acc32	; now store in temp2

; read bypass switch and mute input if we are in bypass
; this lets the trails ring out, we're just cutting the feed
; to the delay but leaving the output alone

cpy_cs		acc32, switch	; get switch
andi		acc32, sw0	; test for switch 0
jz		acc32, doBypass	; if the switch is closed, we bypass
jmp		doDelay		; if the switch is open, we do not bypass
xor		acc32, acc32	; if we are in trails bypass then we need to mute the delay output
cpy_cc		temp2, acc32	; so we put zero in temp2

doBypass:
xor		acc32, acc32	; clear acc
cpy_cc		input, acc32	; put zero in input
cpy_cs		acc32, BOOTSTAT		; get boot status SFR
andi		acc32, 0x0008		; I2CA0 is 3rd bit of BOOTSTAT
jz		acc32, doDelay		; if I2CA0 is low (default) then we do nothing here

doDelay:
adds		feedback, input	; add feedback to input
wrdel		delay, acc32	; write result to delay line

wrdld		acc32, delay!		; put size of delay in acc32
cpy_cc		temp, acc32		; store in temp
cpy_cs		acc32, pot0_smth	; get pot0 value for delay time
multri		acc32, 0.95		; scale to 95%
addsi		acc32, 0.05		; now ranges from 5% to 100% (pretty close anyway)
multrr		temp, acc32		; scale knob value by size of delay

interp		acc32, delay		; get delay from current position, which is in the acc32

multrr		acc32, temp2		; if we are in bypass AND trails is set to OFF, we mute here

cpy_cc		temp, acc32		; put the delay audio in temp for a sec, so we can do feedback
cpy_cs		acc32, pot1_smth	; get pot1 for feedback
multrr		temp, acc32		; scale feedback to pot value
multri		acc32, 0.9		; limit feedback so it doesn't oscillate
cpy_cc		feedback, acc32		; store scaled feedback so we can add it in next sample

cpy_cs		acc32, pot2_smth	; get mix pot value
multrr		acc32, temp		; remember our delay audio is in temp!
adds		input, acc32		; add the delay out (scaled) to the input, gets us delay + dry mixed
cpy_sc		out0, acc32		; and send to output	
There are lots of other options for using the switches in your FXCore programs - some are pretty obvious and some are very sneaky! Hopefully this gives you some ideas to use in your own applications!
Frank
Posts: 159
Joined: Sun May 03, 2015 2:43 pm

Re: BB02: Reading Switches

Post by Frank »

Excellent write up by Matthew, just want to expand on two points he brings up:

1. Reading the sample rate switches
This was intended as a way to write sample rate independent code. For example you have a program that may be run at different sample rates for some reason but you need something like a low-pass to always have the same corner frequency. You could write the code in a way that calculates the different coefficients for the different sample rates and save them to different MREGs. At run time the code can look at the sample rate pins and select the proper coefficient.

2. Reading I2C address
This is useful in a system with multiple daisy chained FXCores where they are all running the same code but may need to have some small differences between them. By reading the I2C address it could determine where in the chain it is and what it should do. I.e. the first one is at 0x30, next at 0x31, etc. so each can tell where in the chain it is and if it should use a different coefficient for a filter or a different length for a delay, etc.
DisasterArea
Posts: 26
Joined: Sat Jul 25, 2020 7:07 pm

Re: BB02: Reading Switches

Post by DisasterArea »

Here's an example of reading the PLL_RANGE values and using that to adapt things in your program.

Code: Select all

; LFO example using BOOTSTAT to read sample rate
; LFO freq is based on the sample rate, so if you change the PLL range, the LFO
; speed will also change.  This program uses POT0 to set the LFO rate from 0.1 to 10 Hz,
; and displays the LFO value on USER0 LED.

.rn	lfoval	r0
.rn	bright	r1
.rn	temp	r14
.rn	temp2	r15

.equ    fs         12000		; leave this as 12000, we will adjust later in the program
.equ    flow       .1			; minimum LFO rate, in Hz
.equ    fhigh      10			; max LFO rate, in Hz
.equ    pi         3.14159

; now we use the assembler to do the maths for us
; this will use the sample rate, pi, and the parameters we set to get the 
; LFO coefficients for us

.equ    clow        (2^31 - 1) * (2*pi*flow)/fs
.equ    chigh       (2^31 - 1) * (2*pi*fhigh)/fs
.equ    cdiff       chigh - clow

// determine LFO multiplier by sample rate
cpy_cs		acc32, BOOTSTAT	; get boot state
andi		acc32, 0x0003	; mask off all but 2 LSBs, we only want the two LSBs
cpy_cc		temp2, acc32	; store so we don't have to do this again

; xori will return 0 if the two things are the same, so
; we can use this to "match" a value

; if we are at 48000 sample rate then scale by 1/4
xori		temp2, 0x0003	; if we are 3 then load 0.25
jnz		acc32, check50	; if we are not 3 then check for 2
wrdld		acc32, 0x1FFF	
jmp		doOsc

; if we are at 32000 sample rate then we need to scale by 3/8
check50:
xori		temp2, 0x0002	; check for 2
jnz		acc32, check75	; if we are at 2 then we load 0.33
wrdld		acc32, 0x2FFF	; put 0.375 in acc	
jmp		doOsc

; if we are at 24000 sample rate we scale by 1/2
check75:
xori		temp2, 0x0001	; check for 1
jnz		acc32, check100
wrdld		acc32, 0x3FFF	; put 0.5 in acc
jmp		doOsc

; if we are 12000 then we scale by 1/1
check100:
wrdld		acc32, 0x7FFF	; put 1 in acc

doOsc:
ori		acc32, 0xFFFF	; fill LSBs
cpy_cc		temp2, acc32

; set LFO rate
cpy_cs  	temp, pot0_smth		; read in frequency control pot
wrdld  		acc32, cdiff.u		; load difference between low and high frequency
ori     	acc32, cdiff.l
multrr  	temp, acc32		; pot0 * cdiff
cpy_cc  	temp, acc32
wrdld   	acc32, clow.u		; load low freq coeff
ori     	acc32, clow.l
adds    	acc32, temp		; add low freq
multrr		acc32, temp2		; COMMENT ME OUT!  scale by sample rate!
cpy_sc  	lfo0_f, acc32		; write to lfo0 frequency control

; sine LFO ranes from -1 to +1, which is more than we need for this.
; scale to 0-1 instead

cpy_cs		acc32, lfo0_s		; get LFO sine ouput
sra		acc32, 1		; now ranges -0.5 to +0.5
addsi		acc32, 0.5		; now ranges 0 to 0.99999
cpy_cc		lfoval, acc32		; store this

; Use Olaf's fantastic PWM algorithm to turn the LED on and off real fast
lednow:
cpy_cs		acc32, samplecnt	; Get the sample counter
andi		acc32, 0xFF		; Mask b[7:0]
jnz		acc32, doPWM		; if the upper bit is 1 then we update the LED

;Reload new PWM value from mixed LFOs into "bright"
cpy_cc		acc32, lfoval		; put value in acc32 for processing
multri		acc32, 0.9		; scale the value signal so that we don't go over
addsi		acc32, 0.01		; and offset so that we never go quite to zero
sra		acc32, 23		; shift the PWM value in place, we only want 8 bits instead of 32
cpy_cc		bright, acc32		; save it

doPWM:
; Performing the decrement prior to driving the LED makes sure
; that the LED can go completly off.
cpy_cc		temp, bright		; put last LED PWM value in temp
addi		temp, -1		; addi expects a decimal number and we want to subtract 1 LSB
cpy_cc		bright, acc32		; Save updated "bright"
xor		acc32, acc32		; Clear acc32 for the LED off case
jneg		temp, doLED      
ori		acc32, 1		; Set acc32[0] for the LED on case

doLED:
set		user0|0, acc32		; set the usr1 output per the acc32 LSB
xor		acc32, acc32		; must have instruction after jump

finished:
xor		acc32, acc32
OK, so what does all this do? Let's start at the top.

Code: Select all

.equ    fs         12000		; leave this as 12000, we will adjust later in the program
.equ    flow       .1			; minimum LFO rate, in Hz
.equ    fhigh      10			; max LFO rate, in Hz
.equ    pi         3.14159

; now we use the assembler to do the maths for us
; this will use the sample rate, pi, and the parameters we set to get the 
; LFO coefficients for us

.equ    clow        (2^31 - 1) * (2*pi*flow)/fs
.equ    chigh       (2^31 - 1) * (2*pi*fhigh)/fs
.equ    cdiff       chigh - clow
This part uses the assembler's math powers to calculate the values needed to run the sine LFO at our desired speed. In our case, we want the max rate to be 10Hz, and the minimum rate to be 0.1Hz. This is pretty good for most modulation effects, but you might want to tweak the range a bit depending on what you're doing. The assembler does the maths for us and then puts them in constants we can access later in the program. Note that we are picking the constants based on a 12000Hz sample rate, which is our minimum. That's because it's easier to multiply down by a fraction than up by powers, since we need "3" at some point. You'll see in a minute.

Next, we need to figure out how fast the clock is actually running, and for that we need to look at the PLL_RANGE0 and PLL_RANGE1 switches, which are in the BOOTSTAT register.

Code: Select all

// determine LFO multiplier by sample rate
cpy_cs		acc32, BOOTSTAT	; get boot state
andi		acc32, 0x0003	; mask off all but 2 LSBs, we only want the two LSBs
cpy_cc		temp2, acc32	; store so we don't have to do this again
Really simple, we read in BOOTSTAT and mask off all but the lowest two bits, then we store that in a CREG so we can do math on it later.

Now that we know the clock speed, we can use that to scale up the LFO rate. We calculated it based on a 12hKz sample rate, so if we are at 12kHz (temp2 = 0x0000) then we can just move on and ignore it. For anything else, we need to scale the LFO rate. The LFO uses an internal counter inside the FXCore, and when you set the LFO rate you're telling the chip how fast the counter should overflow. When the counter gets to the top (it's the bottom, actually) it resets and the wave changes direction. So to make the LFO faster, we need to make the steps of the counter bigger. BUT if we are running the FXCore at a faster sample rate, the counter ALREADY overflows faster, so we need to slow it down to keep the rate constant! It's a lot to think about, but if you use the assembler to calculate the rates for you, there's not much to worry about.

Code: Select all

; if we are at 48000 sample rate then scale by 1/4
xori		temp2, 0x0003	; if we are 3 then load 0.25
jnz		acc32, check50	; if we are not 3 then check for 2
wrdld		acc32, 0x1FFF	
jmp		doOsc

; if we are at 32000 sample rate then we need to scale by 3/8
check50:
xori		temp2, 0x0002	; check for 2
jnz		acc32, check75	; if we are at 2 then we load 0.33
wrdld		acc32, 0x2FFF	; put 0.375 in acc	
jmp		doOsc

; if we are at 24000 sample rate we scale by 1/2
check75:
xori		temp2, 0x0001	; check for 1
jnz		acc32, check100
wrdld		acc32, 0x3FFF	; put 0.5 in acc
jmp		doOsc

; if we are 12000 then we scale by 1/1
check100:
wrdld		acc32, 0x7FFF	; put 1 in acc

doOsc:
ori		acc32, 0xFFFF	; fill LSBs
cpy_cc		temp2, acc32
So what we've just done is "test" the PLL_RANGE values inside temp2. This lets us match on two bits at a time instead of just checking one at a time, FXCore doesn't really have "if...else." So we ask it, "is the value in temp2 equal to 0x0003?" Use an XOR to compare two values, this will return a zero if they match on every bit. So xori temp2, 0x0003 will be zero if temp2 is 0x0003 and not zero if it's a different value. You could also use a subtract here, by subtracting 0x0001 each time and jumping if it's less than zero. Up to you but xor is clean so we'll use it.

We just match the PLL range value to the available options and then we put a value into the acc32 to use to scale the LFO rate later. 12kHz = 1, 24 = 0.5, 32 = 0.375, 48 = 0.25. Because we need that 3/8 value for 32Khz it's a lot easier to just manually put it in than it would be to try to use the barrel shifter or something. And because FXCore is -1 to 0.999 based (S.31) it's always easier to go down by a fraction than up by a constant.

Next up, we need to set the LFO rate. This is done just like in all the examples.

Code: Select all

; set LFO rate
cpy_cs  	temp, pot0_smth		; read in frequency control pot
wrdld  		acc32, cdiff.u		; load difference between low and high frequency
ori     	acc32, cdiff.l
multrr  	temp, acc32		; pot0 * cdiff
cpy_cc  	temp, acc32
wrdld   	acc32, clow.u		; load low freq coeff
ori     	acc32, clow.l
adds    	acc32, temp		; add low freq
multrr		acc32, temp2		; COMMENT ME OUT! scale by sample rate!
cpy_sc  	lfo0_f, acc32		; write to lfo0 frequency control

; sine LFO ranes from -1 to +1, which is more than we need for this.
; scale to 0-1 instead

cpy_cs		acc32, lfo0_s		; get LFO sine ouput
sra		acc32, 1		; now ranges -0.5 to +0.5
addsi		acc32, 0.5		; now ranges 0 to 0.99999
cpy_cc		lfoval, acc32		; store this
We read in the control pot, then use the calculated values for cdiff to set the range for the LFO. Then we scale by the sample rate which we placed in temp2 earlier. Finally, we write the value to lfo0_f, the sine LFO frequency register to set the rate.

The next section just gets the value of the sine LFO and scales it to a usable range for us. FXCore's sine LFOs range from -1.0 to 0.99999ish, and that's too much for this purpose so we pad it down a bit.

Finally, we want to see what we've done, so we use Olaf's PWM LED algorithm to turn on the USER0 LED in response to the value of lfoval. I'll skip covering this as I've already done a deep dive here.

I would recommend that you first write this program to your FXCore's EEPROM (not run from RAM) and comment out the line above that says "COMMENT ME OUT!" Then reboot your FXCore and observe the LED. Flip the PLL_RANGE switches and reset the board, you should see the LFO move at a faster or slower rate depending on the sample rate. This is normal.

Then uncomment the line from above, re-save the program to your chip, and repeat the above test. You should see the LFO stay at the same rate after a reset, regardless of the sample rate you chose. Pretty neat!
Post Reply